Audio classification using Edge Impulse, Arduino Nano RP2040 and deployment on the Arduino Library and on any target device capable of compiling C++ libraries using Linux

The whys:
a.Audio or sound classification can be used to detect particular keywords that one might be particularly interested given the situation or context. For example in industrial processing or manufacturing sound classification can be used in predictive maintenance and therefore helping companies to curb machine failures early which helps with immediate repairs saving revenues. This topic is of a particular interest because while I was working(fieldcloud SAS) we had received a problem with such a definition from a client who wanted to detect a particular sound during the swapping bodies for freight containers. In this example i do not use the real audio files but use environment data audio sounds. I am positive that with minimal adjustments and by following this example a solution can be developed for the same problem that our client faced. Here is a video demonstrating how swap bodies work in principle. During the swapping process, they give out a distinct audio signature that confirms that the crutch locking system is in place and stable. Our task then was to listen for this audio signature using machine learning deployed on an edge device.
b. Then most importantly i would like to create a link between the Arm embedded challenge and industry to demonstrate how the knowledge gained can be used to solve real world problems. I believe that many logistics companies in Africa may face similar issues or challenges and such solutions can come in handy.
c.That the learners may quickly understand the components involved in system integration quickly. In this line of work its not only about the device, there is firmware, hardware,understanding of low-power wide are networks,platforms,data and now machine learning.
Data selection:
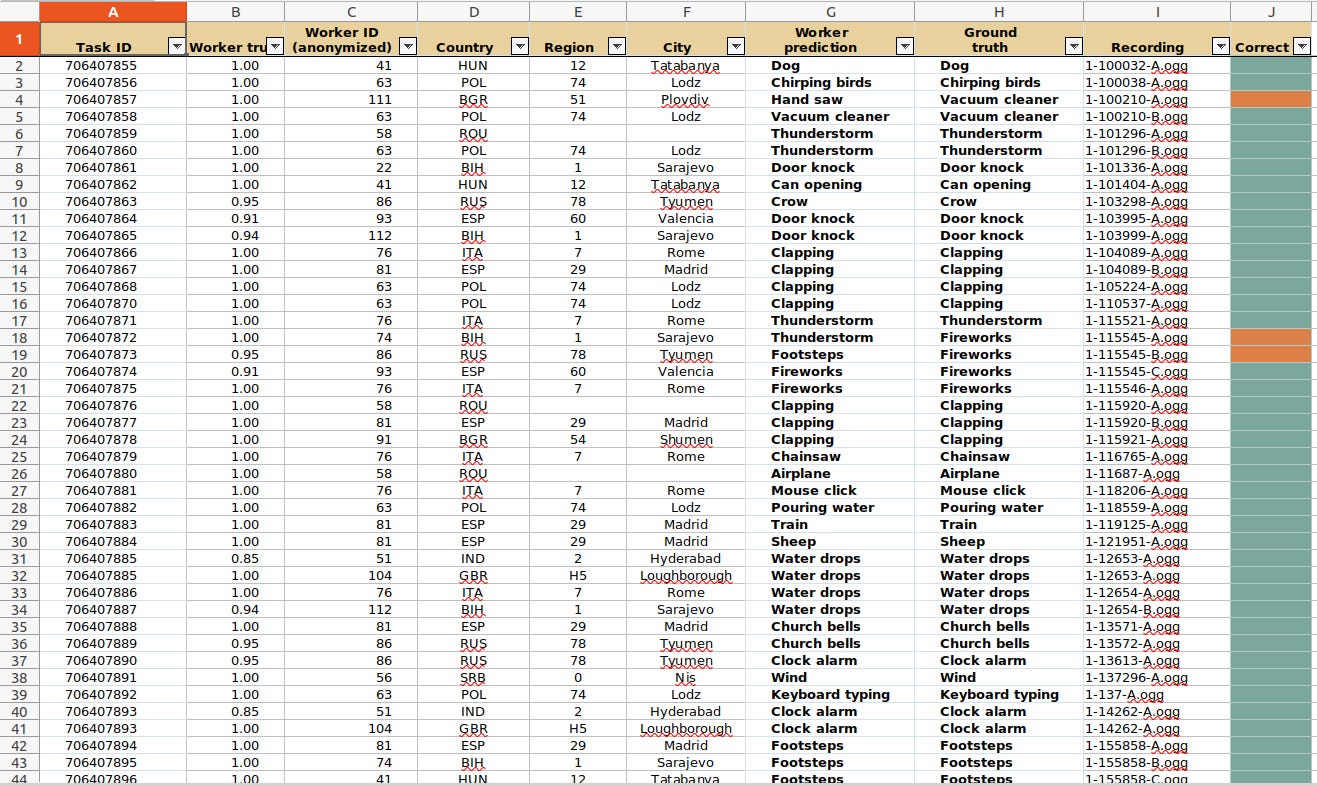
Now that we understand the problem definition,we can move to look for the data to solve the problem. I used the ESC-50-master environmental dataset (labeled collection of 2000 environmental audio recordings).This dataset can be downloaded from here. I downloaded the data and separated into 4 different categories/features/classes (rain,dog,engine,rain).Because the audio files are not labelled, i used this CSV to find the corresponding names for the matching audio files this is on sheet 4. For each of the selected features, i created both training and test datasets.
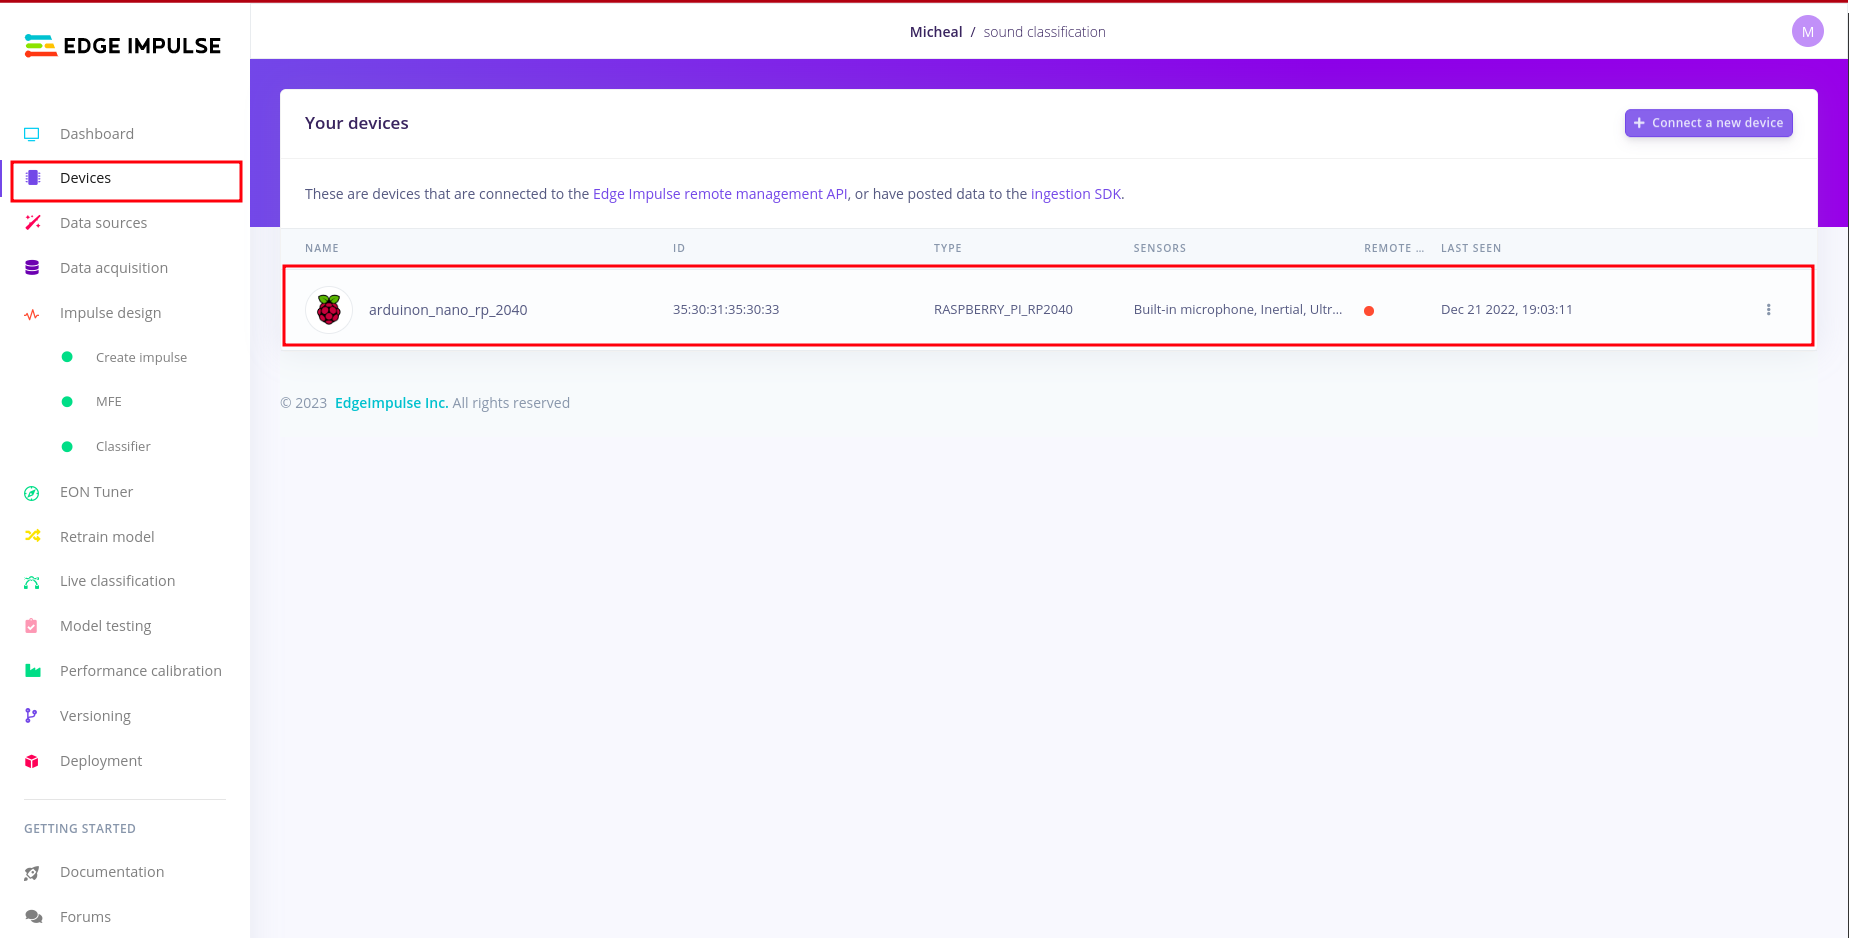
Connect your board to Edge impulse studio:
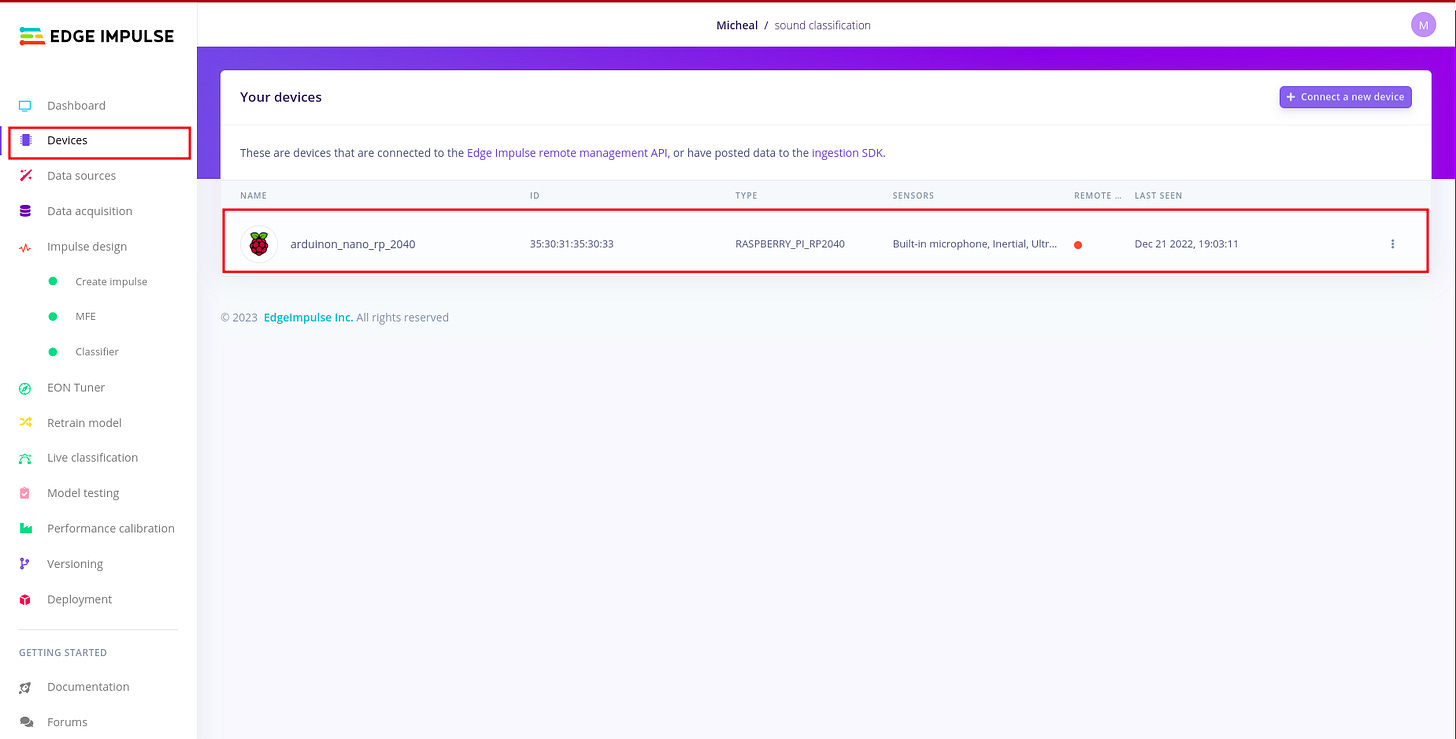
In order to connect your board to edge impulse studio,please follow this article. In edge impulse under devices you should be able to see your device. This is important during the Live classification because you want to listen to raw audio signals from the environment.
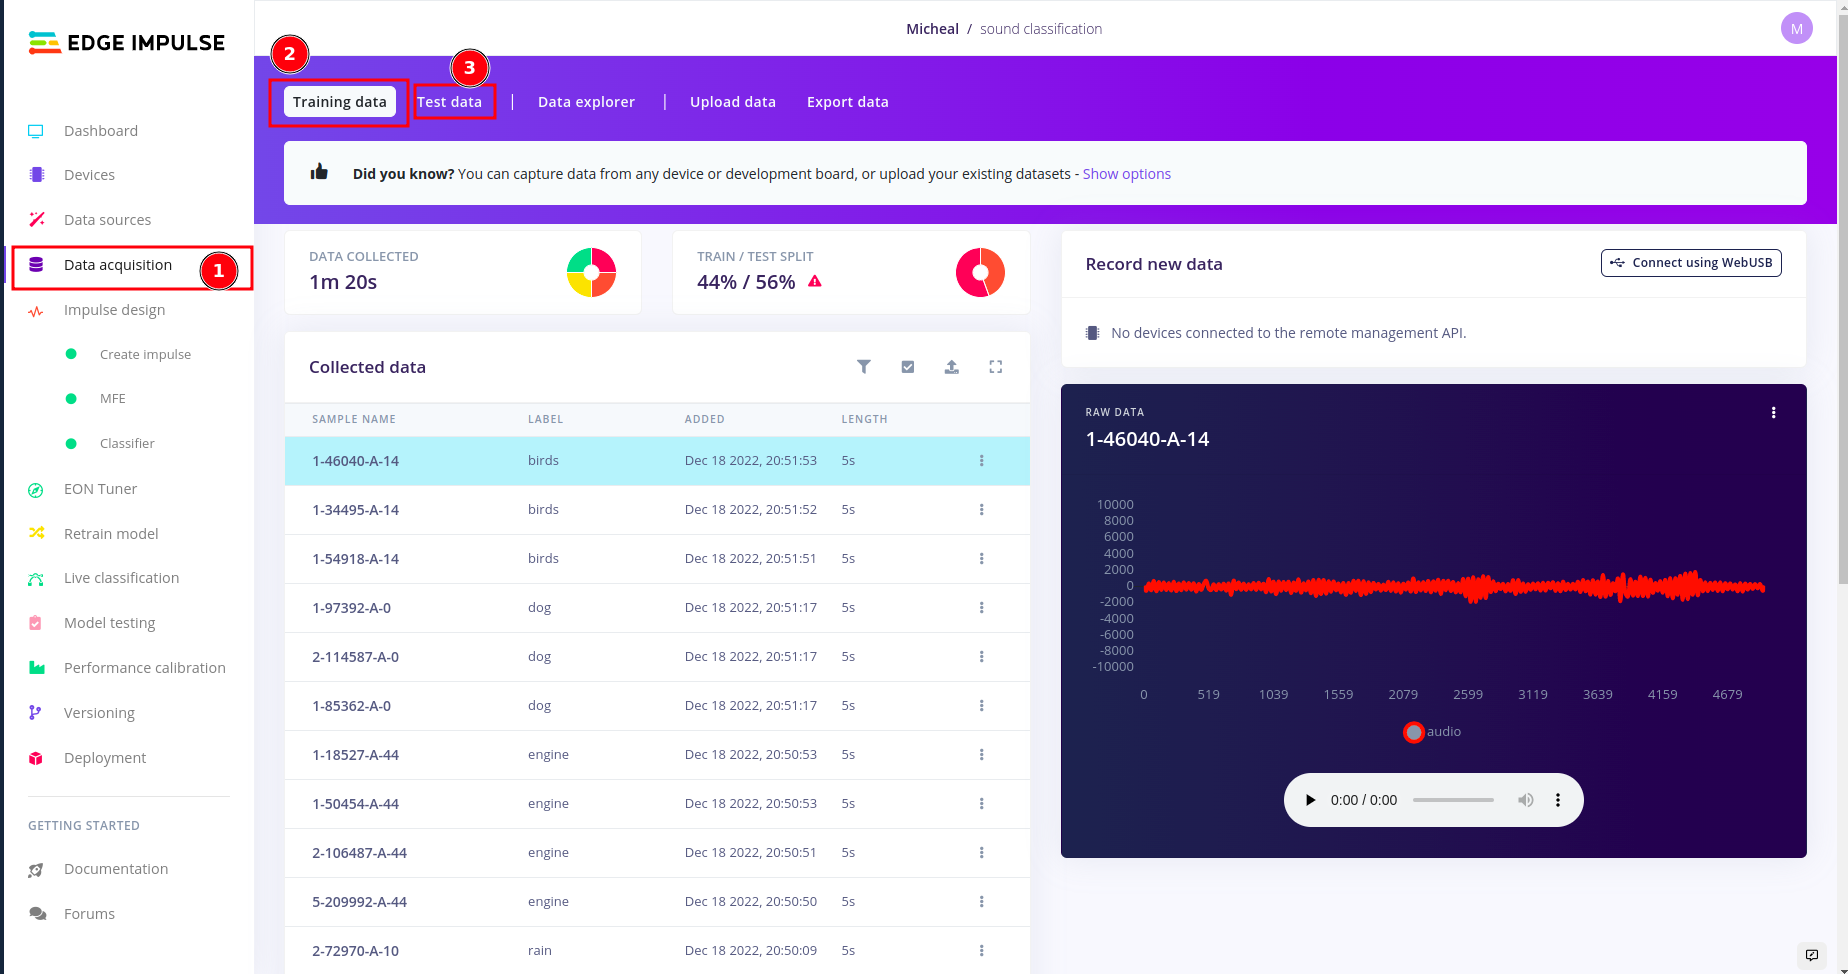
Uploading your audio data files:
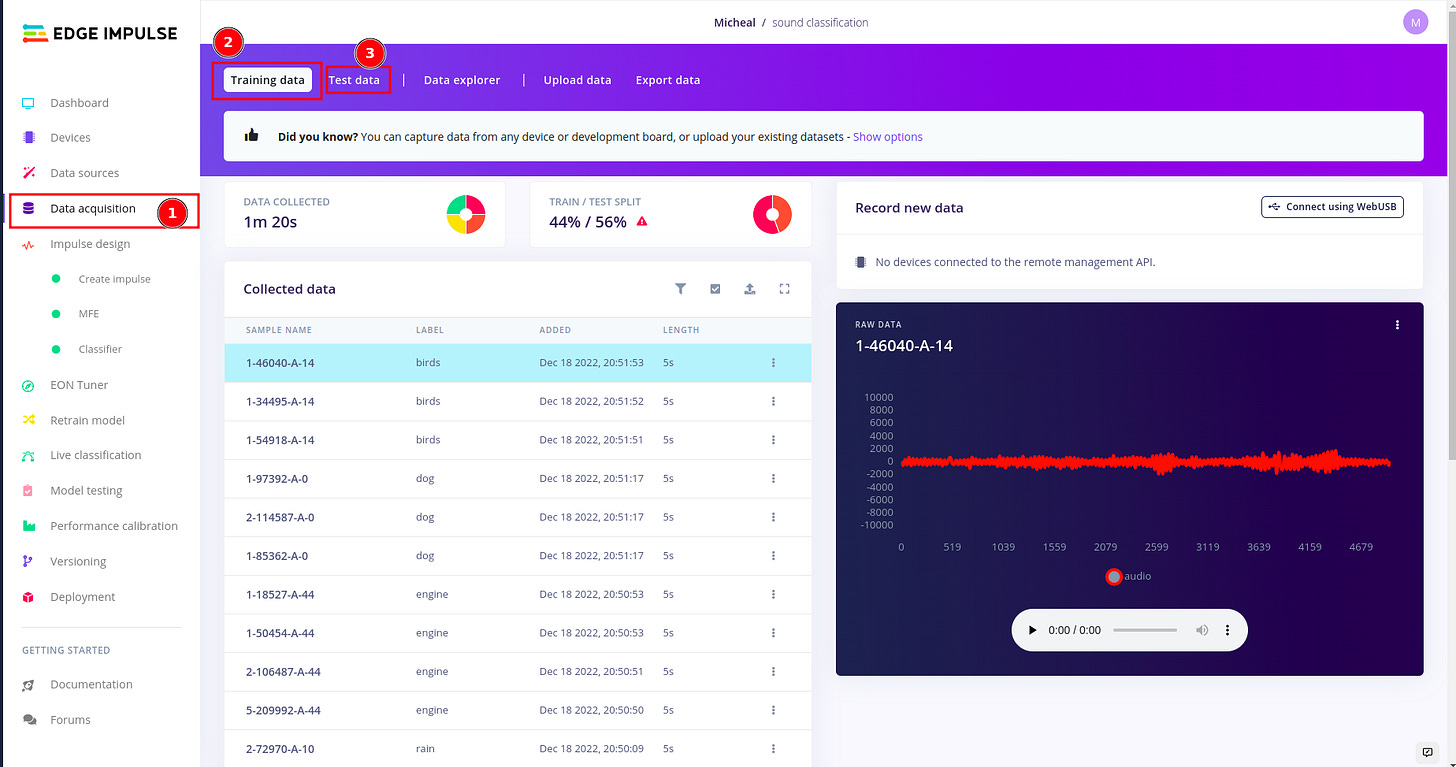
In edge impulse under data acquisition,you can upload both training and test datasets the recommended ratio is 80/20 respectively for every class (or label) in your dataset.
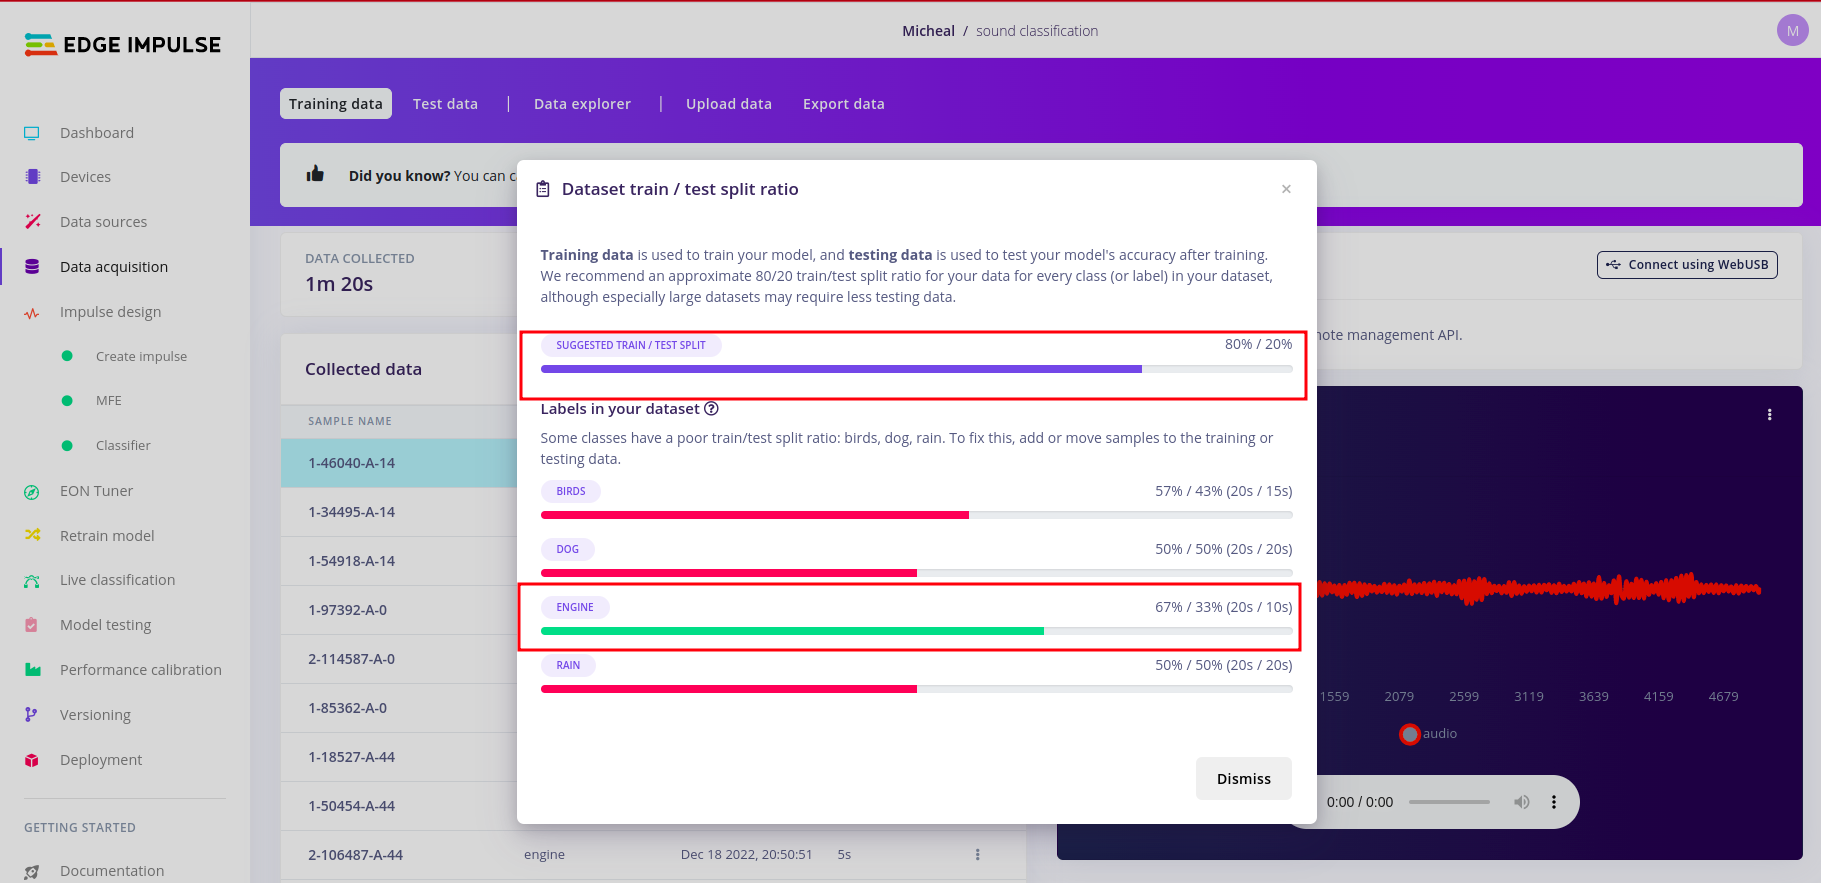
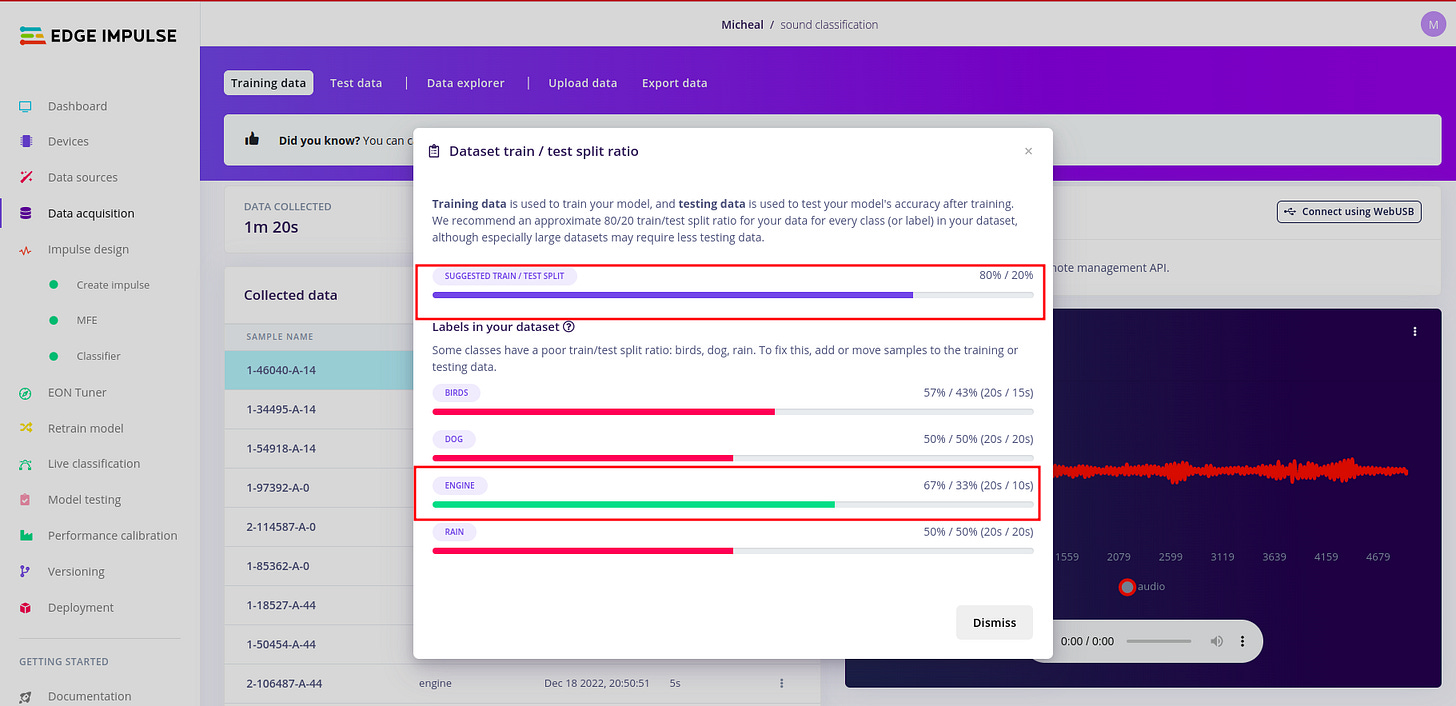
My dataset in this example is poorly split. But it is recommended that you have balanced dataset. To do this kindly click the alert red triangle icon.And you should be able to have a modal window pop up detailing how split your datasets are.
Design the impulse and configure the MFE.
For designing the impulse and configuring the MFE block, I followed the following article written by edge impulse. I found i needed a much deeper understanding about sound, audio and signal processing, so I used the following articles. Audio Deep Learning Made Simple: Sound Classification, Step-by-Step and Machine Learning for Audio Classification. These articles help me to gain more understanding on concepts such as Mel-Frequency Cepstral Coefficients (MFCC). There are other concepts like window size which are well explained in the article above.
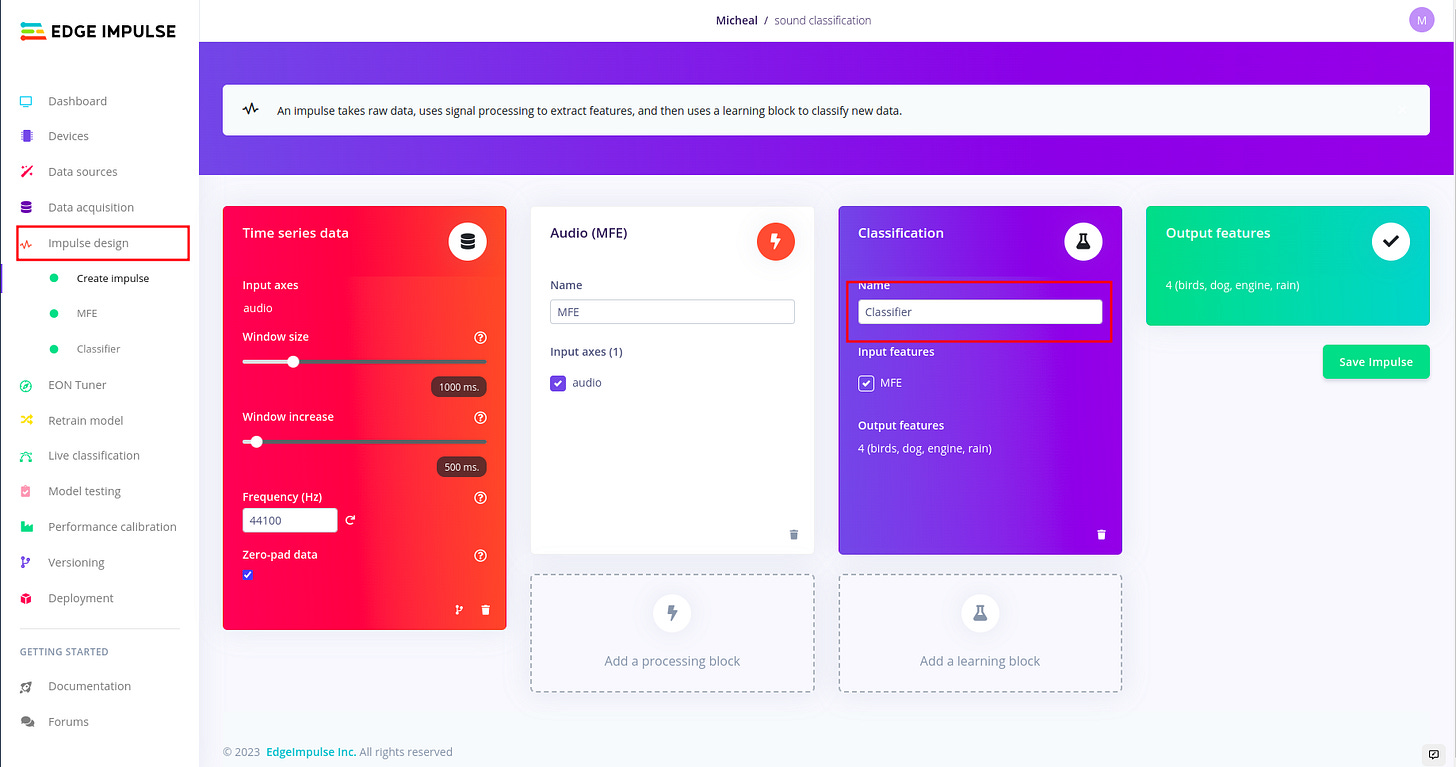
Designing the impulse 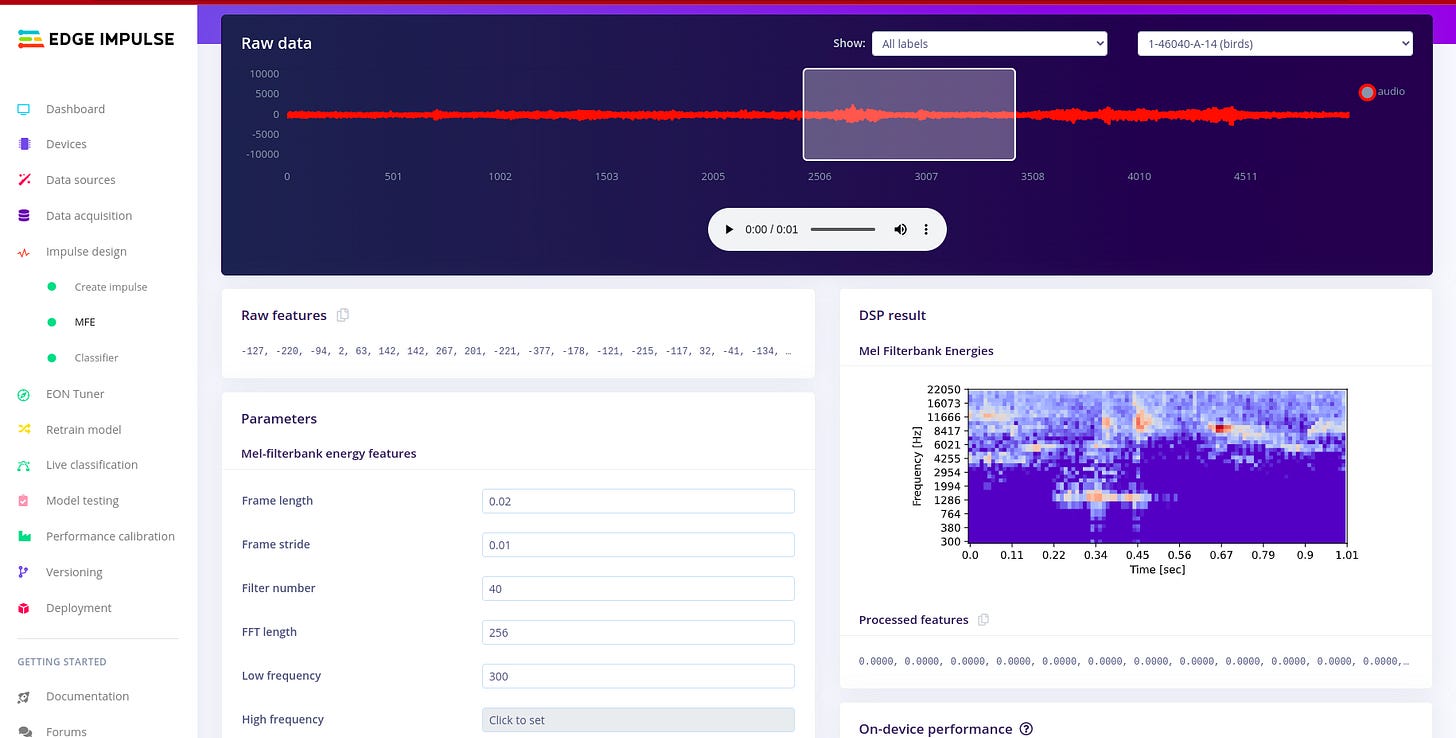
Configuring the MFE spectrogram block. To understand more about audio MFE I read this article i recommend that you also go through it.
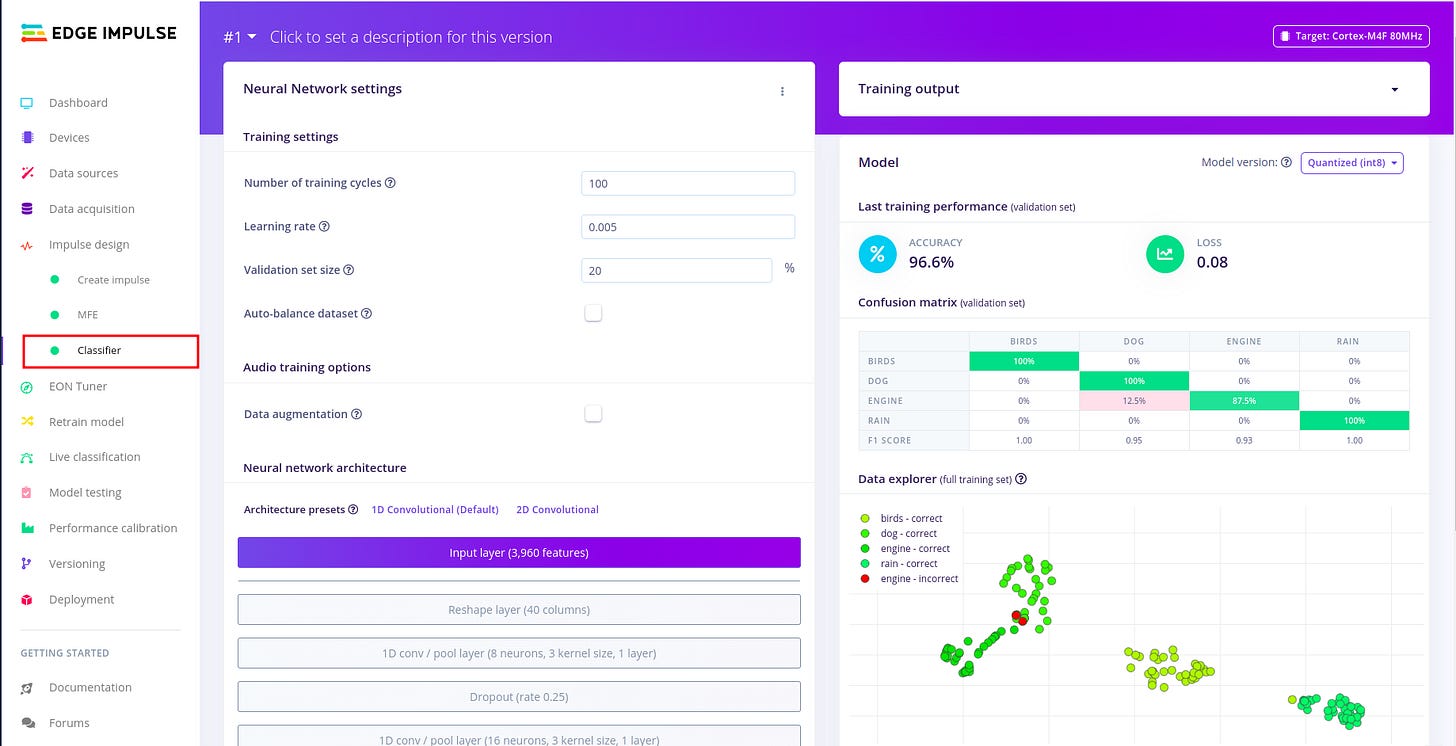
Configuring the neural network.
To configure the neural network I continued to follow the example above with no/minimal changes to preset default settings. I realized that there is need to set time a side and dive deeper into the platform and its technical details. For this will ease understanding of the auto generated code frame-work during deployment so you can manipulate the variables with better understanding.
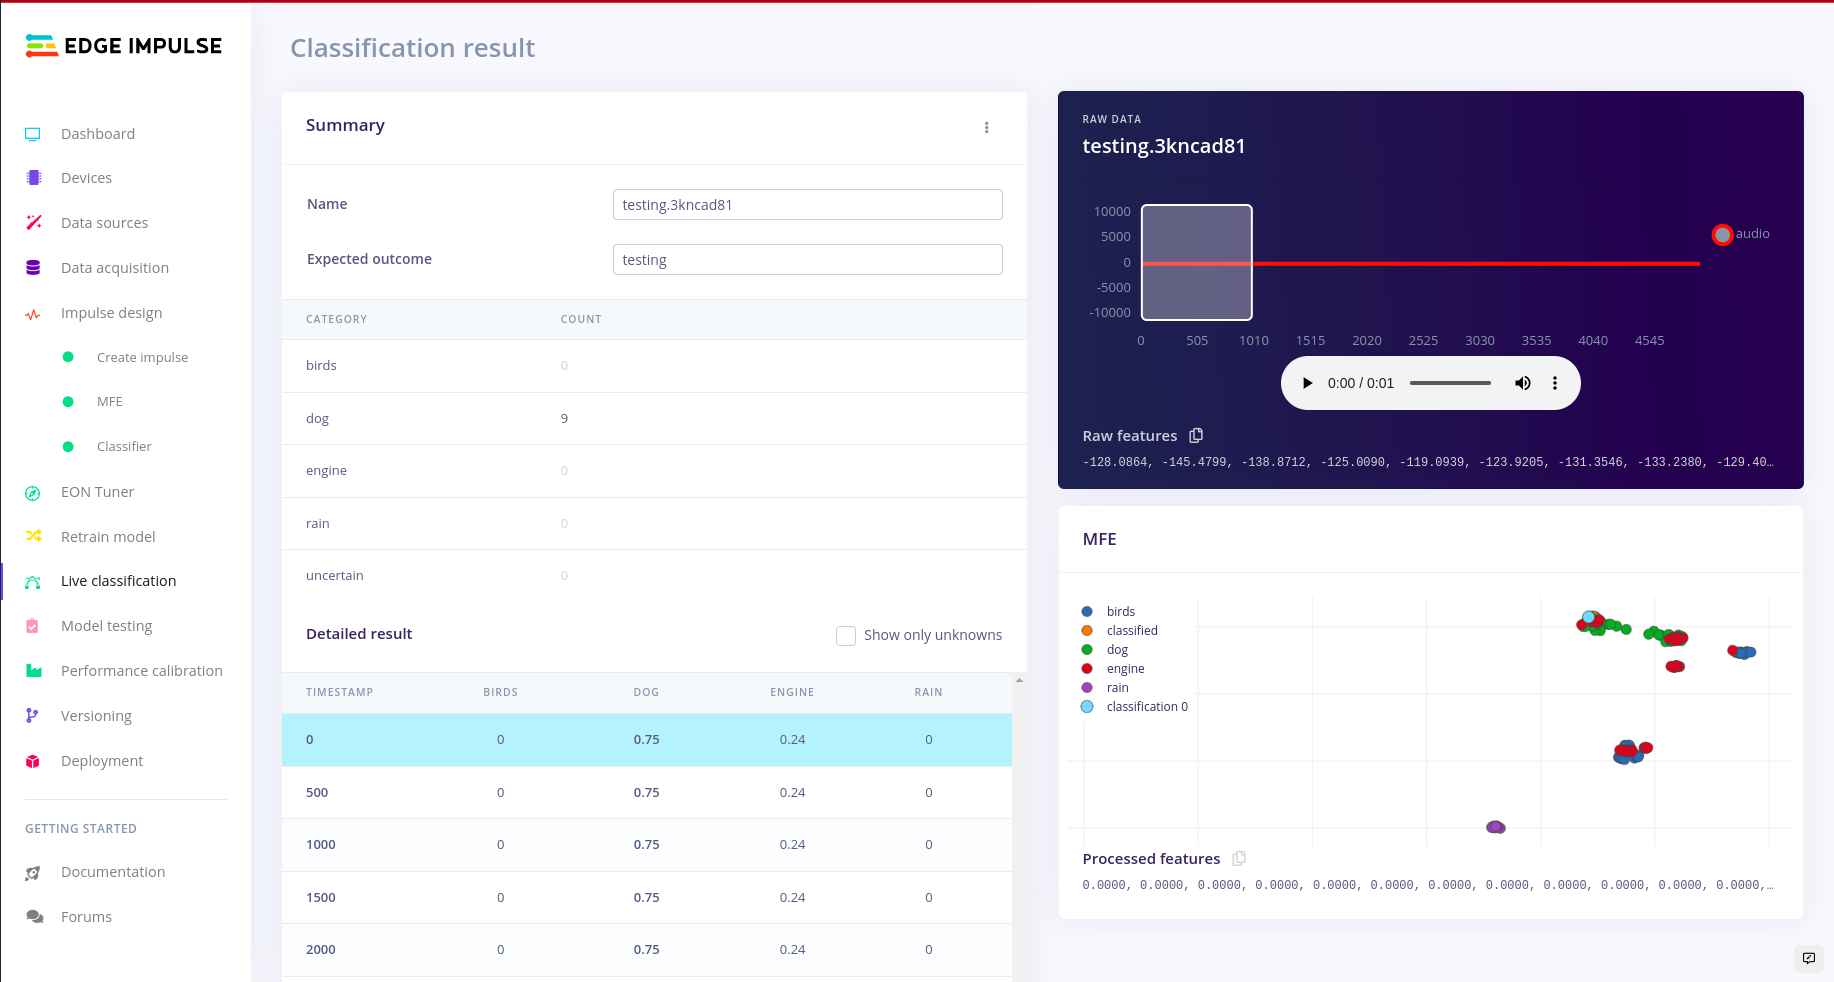
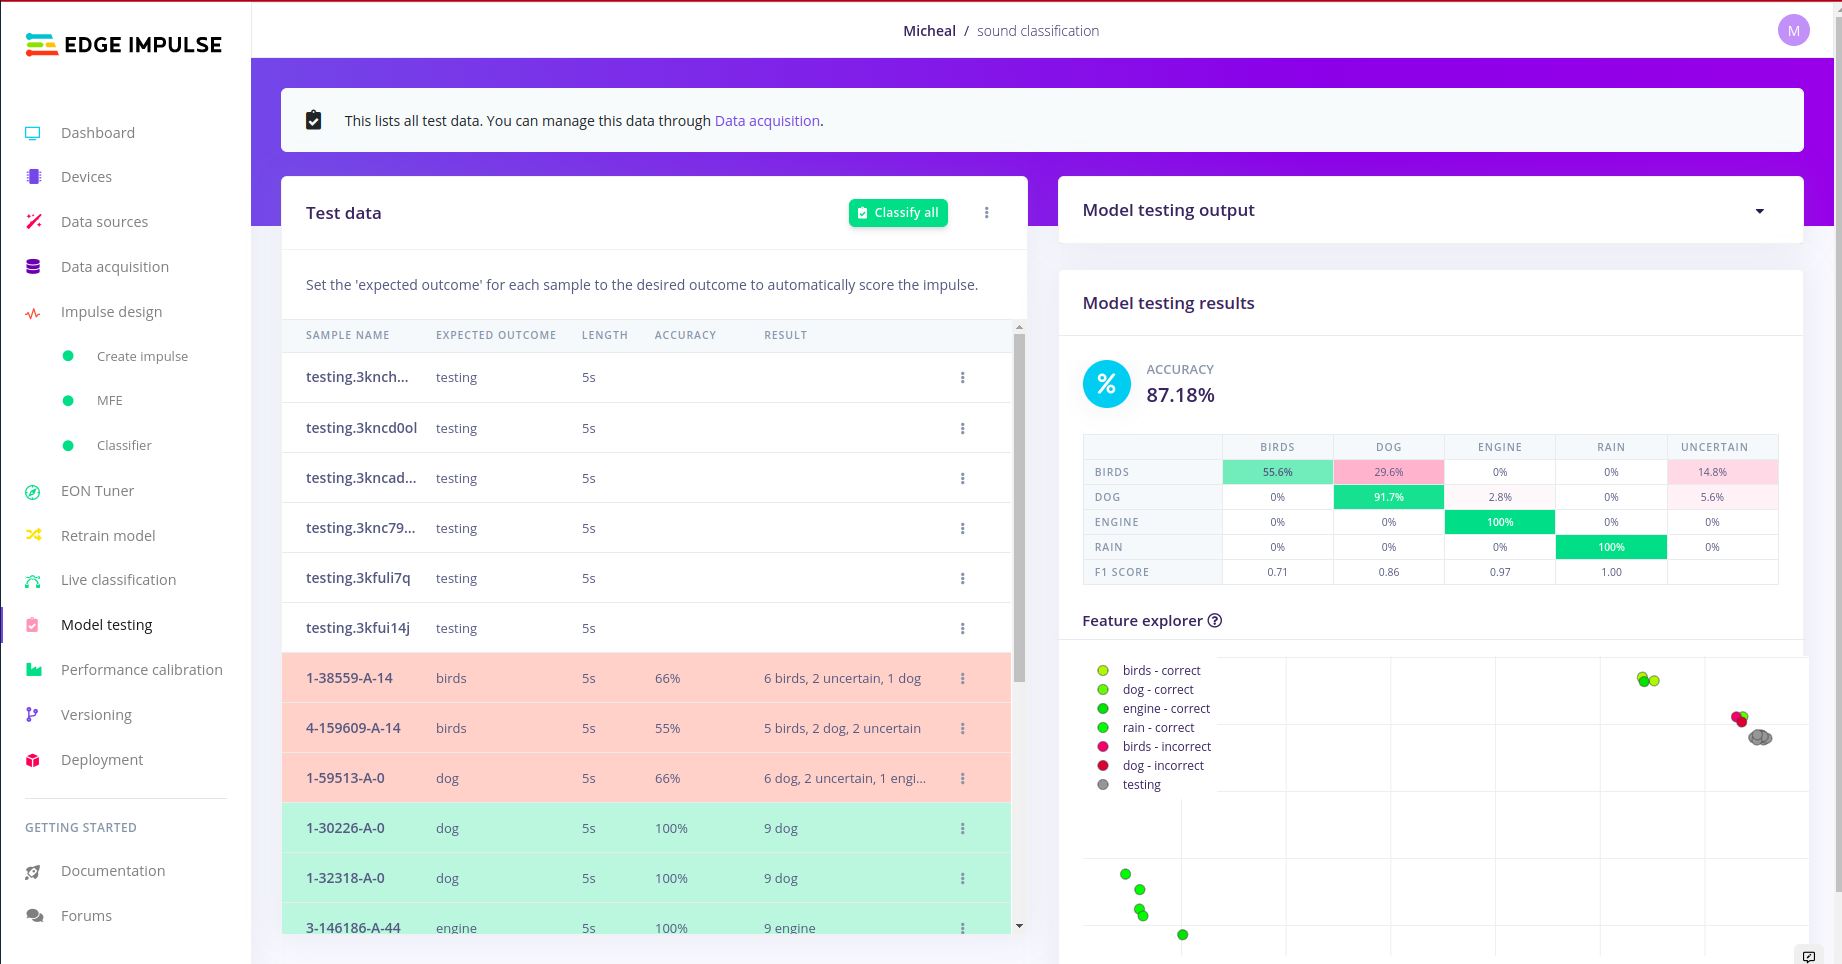
Classifying live data and model testing:
This was of a particular interest, i wanted to test the classified model against using raw data from my board. So to do this, you click under the Live classification tab in edge impulse studio. In order to understand more of what is going on with model testing kindly refer to the article above. There is no need of repeating it.

Live data classification. 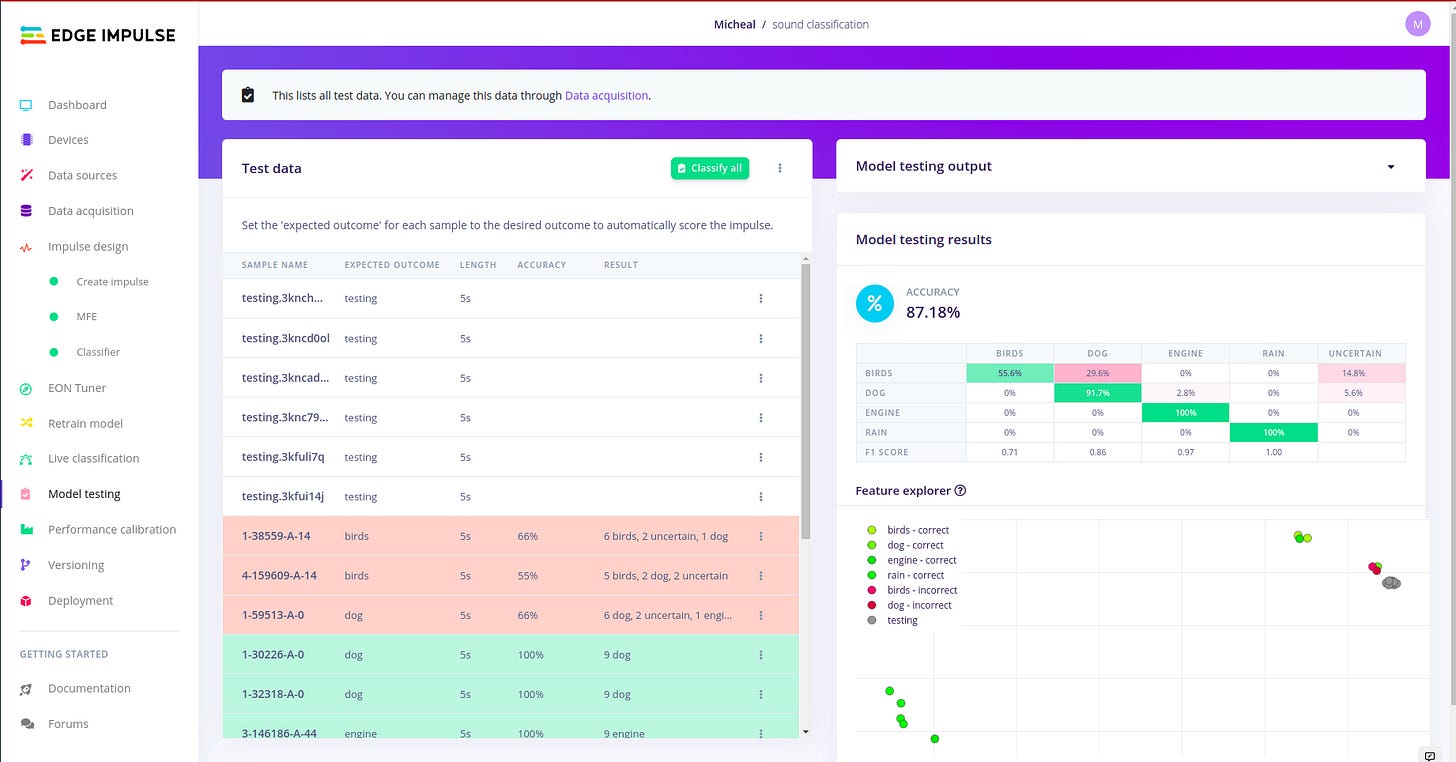
Model testing for the number of test samples done. Deploying to Arduino Library:
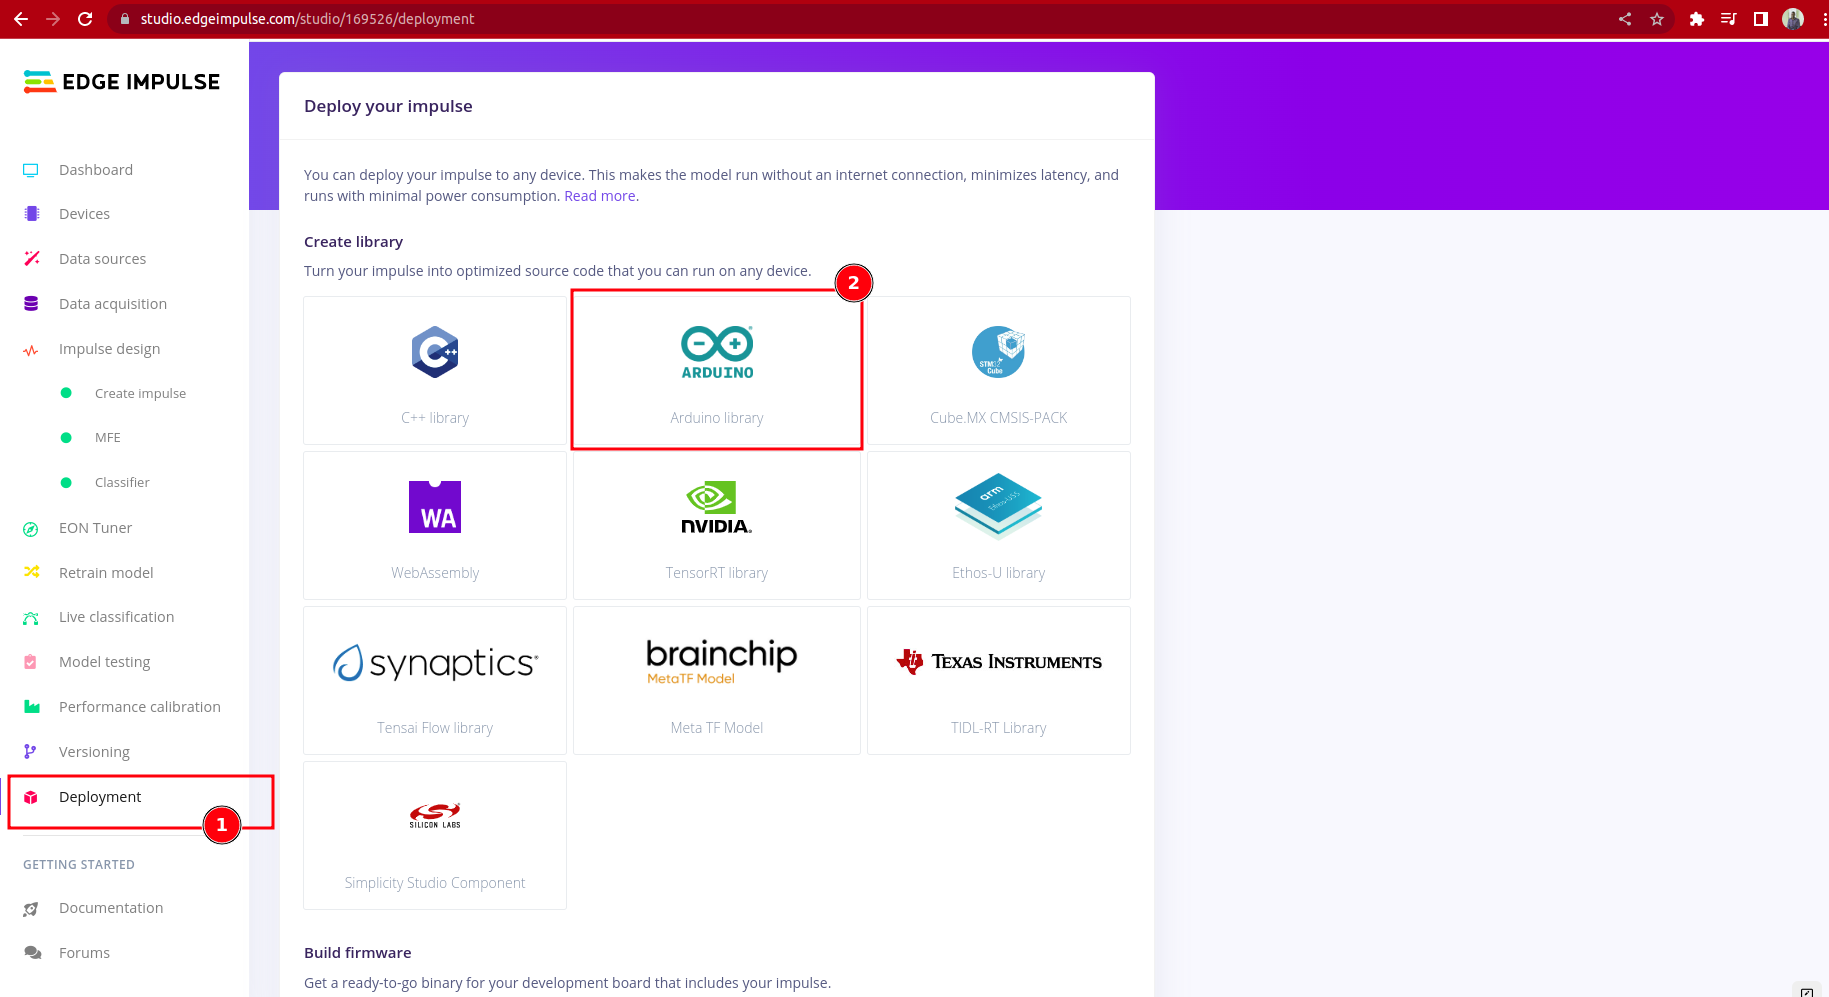
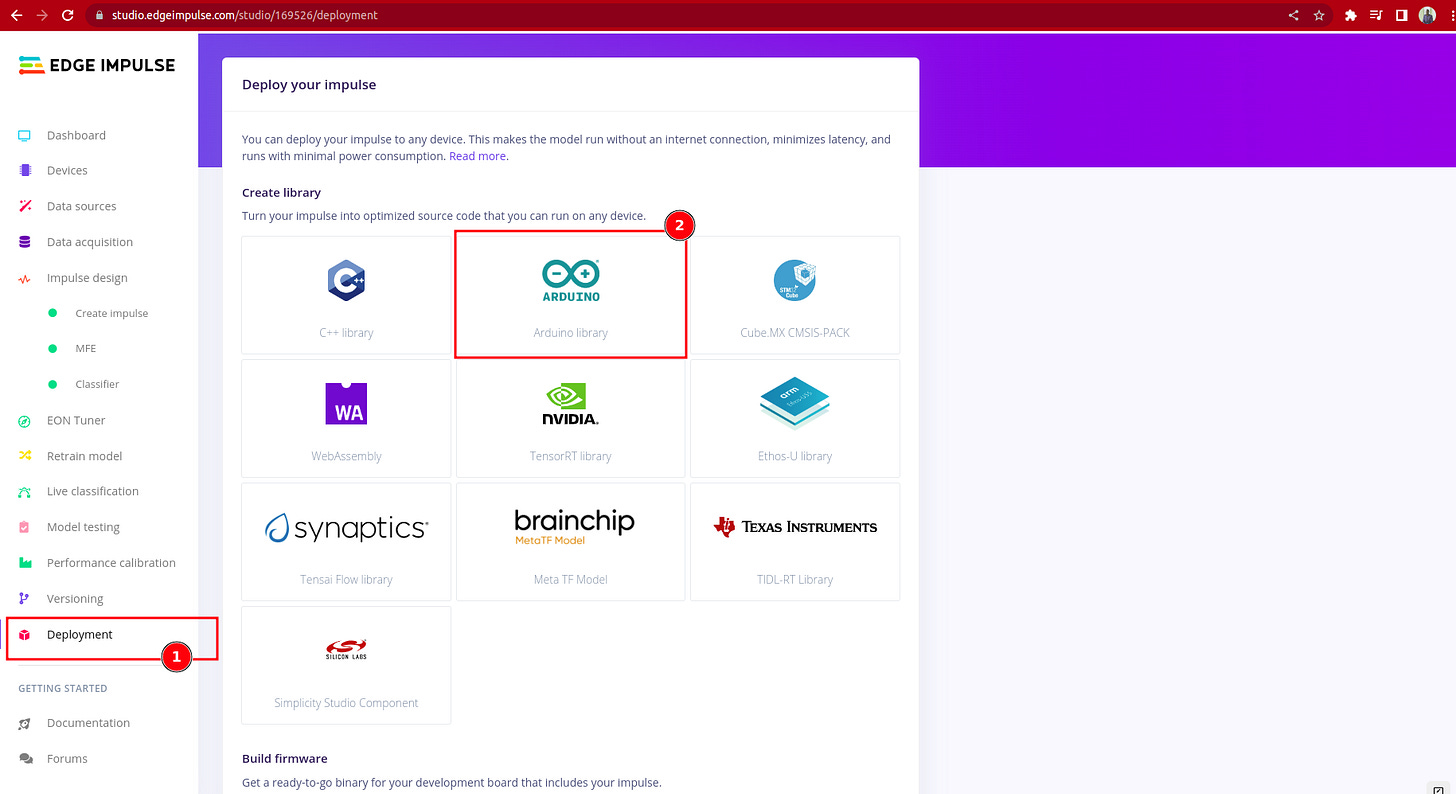
There are many targets in which we can deploy our model but for this example we shall cover deploying to the Arduino Library using the static_buffer sketch and also for any other target that can compiler C++ for example raspberry pi family. There are some important things that need to be noted here that i was particularly unaware of but was made aware by on of the engineers(Louis) at edge impulse.
a. If you compile the static_buffer and you selected the Arduino Nano RP2040 on the Arduino IDE, as there is no sensors involved, it’s just standalone cpp compilation. Therefore after downloading the right Arduino Library zipped files. You can follow this example as on how to add your zipped files to the Arduino Studio under examples and verify and compile the static_buffer sketch.
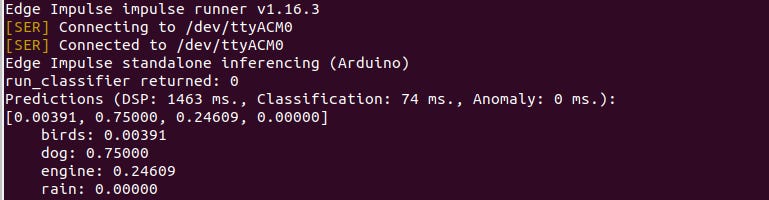
The classification prediction should produce the same prediction results as those in the edge impulse studio test dataset from which you copied the raw features. You may view the results in the Arduino serial port monitor on in your Linux terminal by running “edge-impulse-run-impulse —raw” command which just opens the serial port the device is connected to.

However to run actual commands on the board you can use the following AT commands: Serial protocol - Edge Impulse API. I am still going through the commands and learning all i can. The serial monitor usually delays to show results you may have to change the baud-rate and see which one works for you.
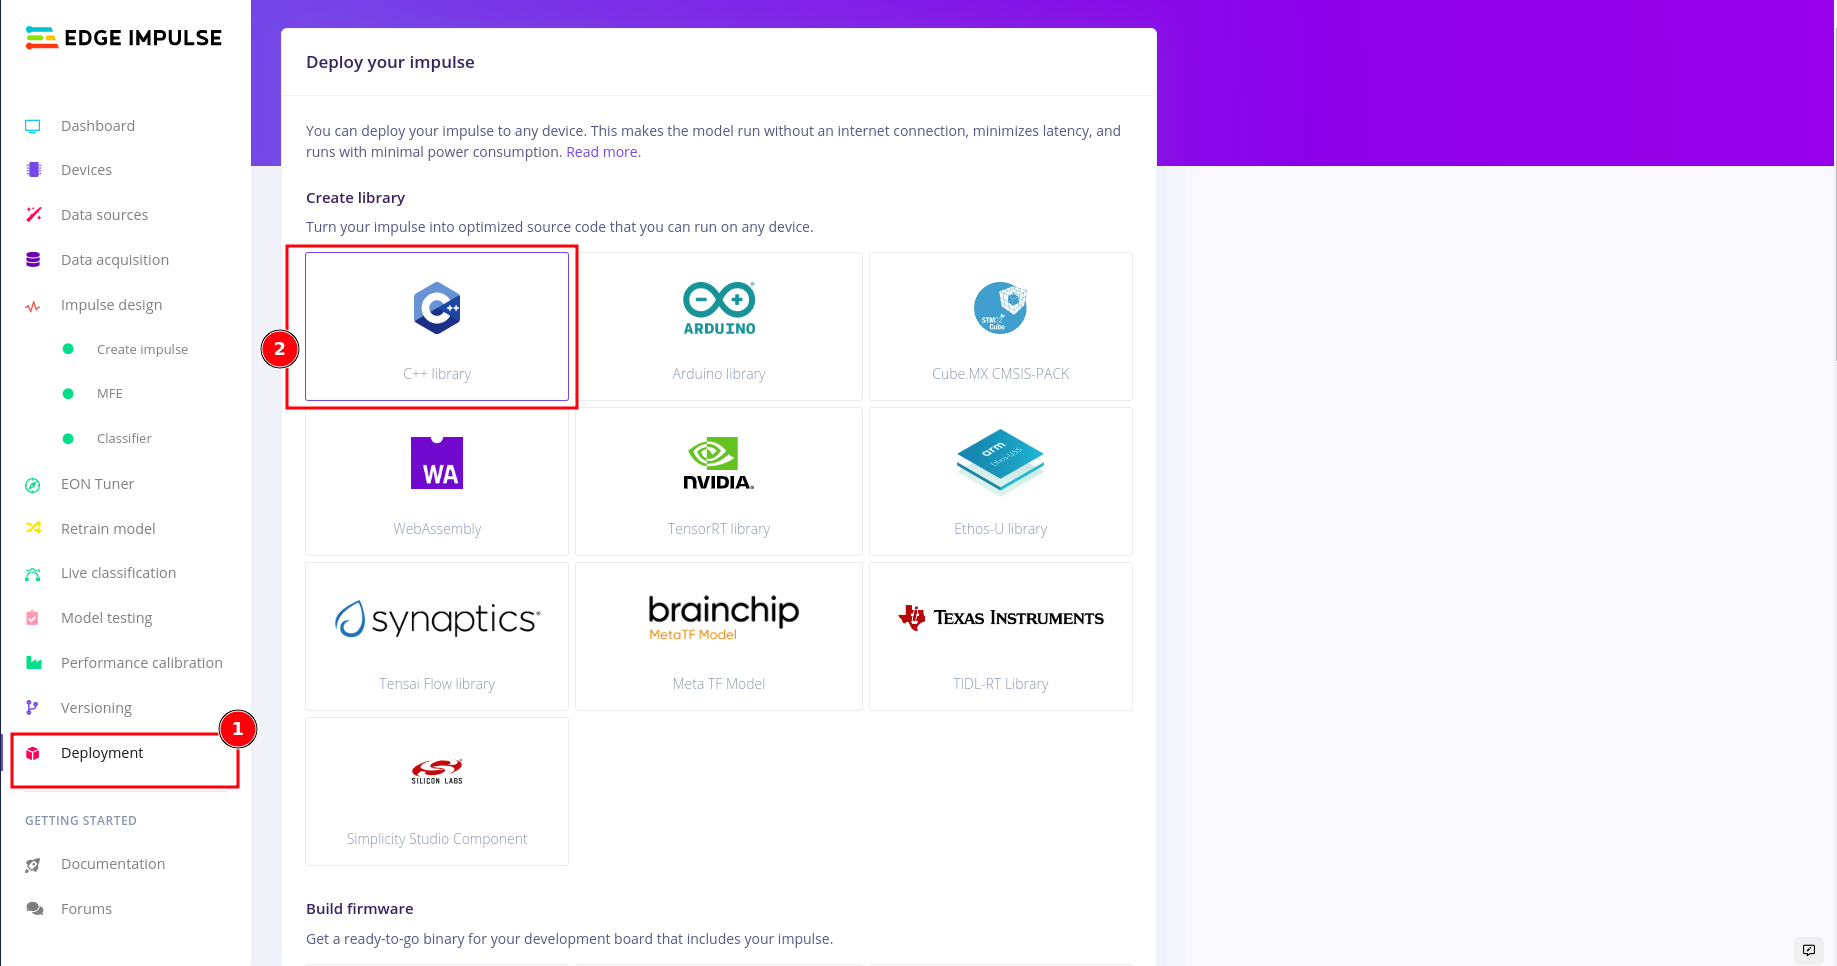
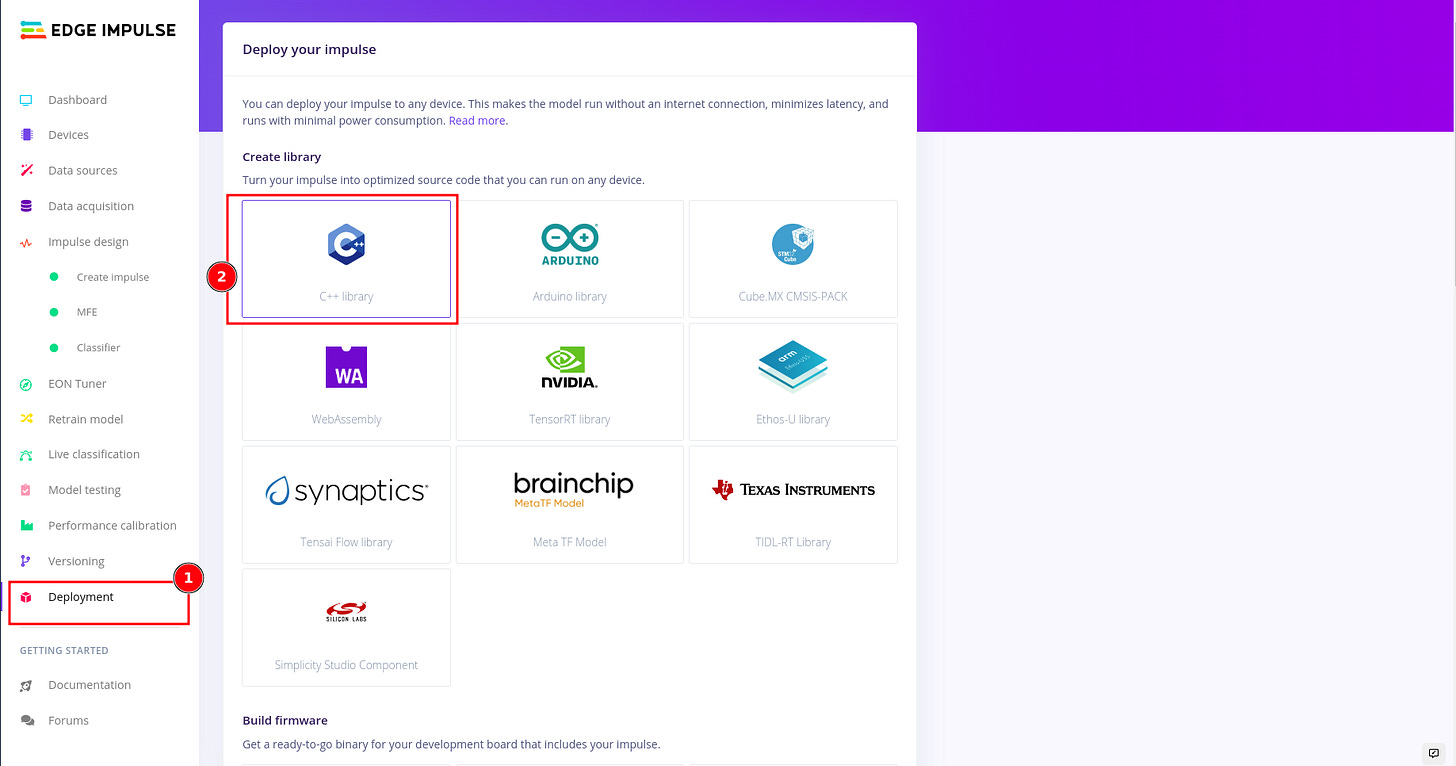
Deploying to any target with the Edge Impulse C++ Library:
In-order to deploy your model to any target device that can compile C++, first select the C++ Library under deployment tab in your edge studio.
Download and unzip the folder. And kindly follow the following articles running-your-impulse-locally, deploy-your-model-as-a-c-library to again more understanding of what going on especially the g++ and gcc, GNU Make compiler collections for those on Debian based systems. I also followed the following video Deploy an ML Model to Any Target with the Edge Impulse C++ Library, by Shawn Hymel in order to understanding the folder structure and gain a bit of more understanding of the file composition and what they should accomplish.
I created a Github repository for the project that can be found here. If are running on Linux you may just clone the repository build the application and run it locally on your computer. These are results after successful compiling and build.

Here are some articles about compiling the Linux kernel,for raspberry pi and building Debian packages that you might want to go through to bring you up to speed if you are new to world of compiling or cross compiling. I found another article,Arm Compiler for Embedded User Guide on the Arm website that might be worth taking a look, i have not gone through it but will get time and go through.
What is next?
Due to the fact, that edge impulse has not yet started supporting the Arduino Nano RP2040 through the Arduino sketches examples. I will continue to work towards developing my own own sensor sampling strategy to feed the buffer in-order to perform a continuous audio sampling inference to detect a particular sound and send an email notification. However this will be for targets capable of compiling C++ libraries. In the future, I will also would like to investigate how such TinyML deployments can be done for edge servers and gateways using software containers and orchestration with Docker or Kubernetes using containers like MircoEJ.